Sunday, February 27, 2011

Wood Blocks


This is a simple project I did today after staring at these blank wood blocks for weeks.  I wanted to come up with something for our entertainment stand and finally settled on relax.  I figure it fits the purpose of the room so why not?  I mod podged & sanded the scrapbook paper first.  I then glued on my chip board letters and found them a home :)


What do you think?
post signature


Sharing With:


Anything Related

Weekend Inspirations


I have came across one of the most awesome sites this past week.  This site is seriously filled to the brim with amazing projects.  The site is Childmade.com.  A site dedicated to featuring ideas from around the web.  As a bonus it is a Perpetual Link Party where the sharing never ends.  Seriously, how cool is that?  I stumbled upon it when I saw my Barn Star had been added to the projects and simply fell in love with what I saw.  You can easily search for projects or just browse the recent additions.  Sheri has found a wide variety of fun and interesting things to do with your child, for your child, or even by yourself for yourself!   I am truly inspired and now have a growing list of favorites on her site.  Thanks for all the hard work Sheri!  I hope all of you check out this amazing site and get inspired too.
Childmade

Saturday, February 26, 2011

Free Valspar Paint Sample


I just came across this awesome sample and had to share with you!  Valspar is giving away a free sample kit and a $5 off coupon for the color of your choice!  You can get your sample here.  Every paint sample order is shipped with a paint roller and tray for each sample; a paint chip of each sample color ordered; an envelope of coordinating color chips; instruction card; and a coupon for your next Valspar paint purchase at Lowe's.
I originally saw this over at Christina's Adventure's where she already got her sample :) Thanks for the heads up Christina!

Ps...I ordered the Cream Delight!  I can't wait until it gets here!


post signature

Thursday, February 24, 2011

A Guest Post & Giveaway

 I am so super excited to be guest posting today at What Allie's Making Now !  Make sure you go link up to her awesome Linky Party too!
 I wanted to announce that I just recently reached my 100 Follower milestone and decided to celebrate by having a Giveaway!  I am giving out one of my handmade Barn Stars

{ And guess what??}

Allie is going to give away a kit to another lucky winner 
that includes all of the stuff to make yourself one of the Barn Stars!
 So, here is what you have to do to enter to win!
~Make sure you are a follower both here and over at Allie's
(This is a must to be eligible)
~Leave a comment on either blog on 
where you will put your Barn Star in your home
So this means, if you leave us both a comment you actually have a better chance of winning,
 as there will be two drawings.
 The winners will be announced at both blogs on March 2nd.

 So, good luck!!

P.S.  Thank you again to Allie for allowing me to strut my stuff on your awesome blog!

Wednesday, February 23, 2011

Easter Egg

Hey guys, I wanted to show you a quick tutorial on something fun I made this morning. We ate the last of the cereal during breakfast and wanted to make something cool with the box.  Is it me or are there tons of recycling projects with cereal boxes?  Well here goes another just in case you missed the craze....
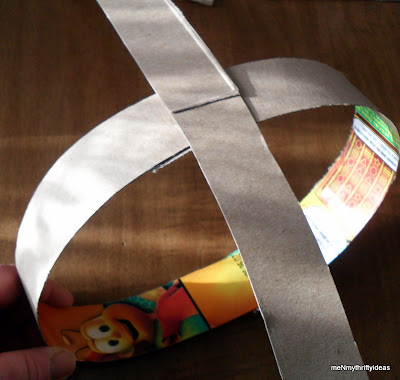
Start off cutting the cardboard into strips about 1-2in wide.  I used a total of 8 for our egg.
Next you need to glue the strips together forming a loop.  I used hot glue for this.
This is what your egg should look like when its all glued together.  
Next I spray painted the whole thing with Black spray paint.  {This is where I realized that I should have painted the strips before gluing} I then painted the outside of the strips in blue.
I had to use craft wire to get the egg shape.  I simply cut a piece long enough for the inside of the egg and formed Ts on each end.  It fit perfect.
I used raffia to make a "nest" for the egg and found the perfect table to display it on.  Simple, free and cute.  Works for me :)
 What do you think?

Sharing With:
Party Button

Tuesday, February 22, 2011

Lucky Bits

I am so incredibly ridiculously excited to have reached the 100 follower milestone and seriously want to thank all of you for taking the time to read and comment.  It means so much to everyone to feel like someone cares, especially me.  I never thought anyone would even care what I made but you guys have given me so much motivation to do bigger and better projects.  SO why not have a giveaway to celebrate, right?  I will be posting tomorrow about this but I just couldn't wait to let you know I noticed. :)

Allie from What Allie's Making Now has came up with the cutest idea!  She might seriously be the cutest mom ever. She has made a jar of personalized Lucky Bits to carry around for some extra luck that I am sure we all could use!  Forget using a plain old penny!  I know I want some extra luck right about now!  So if you haven't already, check her out because her blog is packed tight with awesome projects like this and she also hosts a Linky Party that has no limit to the amount of projects you can share.  Yup, she is cool like that!  
Party Button


P.S.  Did I also tell you that she might be the nicest, most helpful blogger I have met to date?  I am so thankful to have met such an awesome friend through blogging.  So make sure you find some time to share the love :)

Friday, February 18, 2011

DIY Cardboard Barn Star

Don't forget to enter my Giveaway so that you can Have your own Star!! *PLUS* When you enter at What Allie's Making Now  she is giving away all the supplies needed to Make your own
Barn Star!


I love all the barn stars in everyone's decor and decided I should try to duplicate this look.  I have seen  people making stars from paper and have even tried it myself but I wanted something I could hang on the wall.  My solution?  Lightweight Cardboard.  I used empty boxes from a 24pk of Pepsi and a cereal box.  I first measured & cut my pieces into 9x9 squares.
I then folded each piece in half and then folded all the corners in to that middle line.  I decided not to make a perfect kite shape just to be different but you could always go traditional if you want.
I then used my hot glue gun to secure one end of the corners together.  I also glued the other flaps that I folded to each other forming the star shape.

After allowing the glue to dry I spray painted it first black as base paint and then went over it again with the Champagne color.  

I let that dry and all there was left to do was hang it! How simple and free?! Love it.
Sharing With:
monogram Chic on a Shoestring Decorating

Tip Junkie handmade projects


SAS Interiorsmmm button