Showing posts with label DIY. Show all posts

Saturday, February 25, 2012

Word Art

Hey everyone!  Does anyone else love Word Art like me?  I am obsessed with decorating my house with inspiring words.  Here are some examples of projects I have completed using words...


(I also love using an old piece of wood as my canvas)

Let me know what you think and any words that inspire you!


Sharing With:

Photobucket


Sunday, February 19, 2012

Hardware Samples into Decor

Hello everyone!  Today I wanted to share with you a little project I have came up with that I think is 

pretty awesome!  


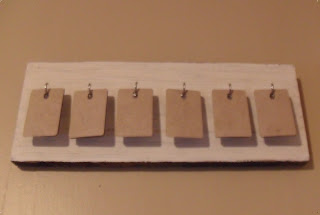
While walking through Home Depot  {my favorite store}  I came across these little "tags" that are 

samples of different laminate flooring and my mind started turning...


{Hmm...I bet these bad boys could replace the cardboard tags that I am constantly making!}   

I grabbed a bunch and went home to test my theory.  I figured since they were a laminate surface I    

could use Dry Erase Markers to decorate the fronts and just erase and repeat!


And what do you know? My theory was right!! {YAY}
Next step was to make a place to display them since they can be reused...


I also have a Memo Board that I dress up for the different holidays and have incorporated  

these little "tags" into!


Let me know what you think!

Shared With:


Saturday, January 7, 2012

Handmade Holiday Decor

Hello everyone!  I wanted to show you all a few of my favorite crafts I made recently for the holiday season...

Don't be shy!  I'd love to hear what you think!  I hope you all have a great weekend!


Sharing With:

Pink Hippo Party


Saturday, May 14, 2011

DIY Home Wall Hanging

Hey, how is everyone this Saturday morning?  I wanted to show you a sign I made while my laptop was on "vacation".


I used scrap wood and Mod Podged some old book pages to it.  I then cut my letters out of cardboard and painted them.  I used a chipboard frame for the "O".  I drilled holes in the wood to attach the wire for hanging.  You can easily twist the wire by wrapping it around a pen/pencil/paintbrush etc. I hot glued my letters on and finished it all off with a nice coat of Mod Podge.  What do you think?

Sharing With:

 Weekend Bloggy Reading

Monday, May 9, 2011

Scrap Wood SIgn

Hey guys, how are all of you today?  I am great and wanted to show you a little sign I made out of a piece of scrap 2x4 wood.  I used Mod Podge to cover the piece with a brown lunch bag.  I then added a cute plaid ribbon with hot glue.  I picked up some wood letters a while back and finally used scrapbook paper to decorate them.


After sanding the edges of the letters all I had left to do was hot glue them on the wood and attach  
a bracket for hanging.  What do you guys think?  


Sharing With:


Boogieboard CottageBWS tips button

Saturday, May 7, 2011

Another Use For Pallets

I love a good pallet project and this morning I decided I should show you all what I came up with the leftover "stubs" in between the boards.  The pallet I got had huge blocks supporting the middle so I figured I might as well use them too!


That's right....candle holders!  I painted them white and added the numbers for a little extra something!  What do you think?  Any other ideas for these wood blocks?

Sharing With:

The Best Part Of BelieveFeatured on Pinkapotamus

Thursday, May 5, 2011

Better Late Than Never


A while back I was supposed to host the first themed party featuring 3 items and I missed it so I wanted to show you all what I came up with.  Again...I apologize for missing the link ups and hope you all can try to understand that I wanted to participate but couldn't.

The items to use were paint chips, cereal box and twine.  I came up with a cute little purse for Miss Olivia to drag carry around.  :)  First choice was an empty Cheerios box but a certain little boy insisted on using it to tote around his cars.  I simply folded the sides in the middle to create the purse look.  I also cut off the top portion that had been opened.


I painted the empty box and added a brown lunch bag to serve as the inner "liner" for the purse.  


I used my hole punch to make a spot to add the "purse strings"  :)


Next Olivia and I decorated the new purse using only paint chips, mod podge and a hole punch... and ofcourse a little glitter for some glam!


The whole project only took about a half an hour but this little box purse is actually pretty sturdy and she has been using it this entire time!  

P.S.  I managed to snap a shot of Tre at breakfast with his new "car tote" too ;)


Sharing With: