Showing posts with label Cardboard. Show all posts

Wednesday, February 23, 2011

Easter Egg

Hey guys, I wanted to show you a quick tutorial on something fun I made this morning. We ate the last of the cereal during breakfast and wanted to make something cool with the box.  Is it me or are there tons of recycling projects with cereal boxes?  Well here goes another just in case you missed the craze....
Start off cutting the cardboard into strips about 1-2in wide.  I used a total of 8 for our egg.
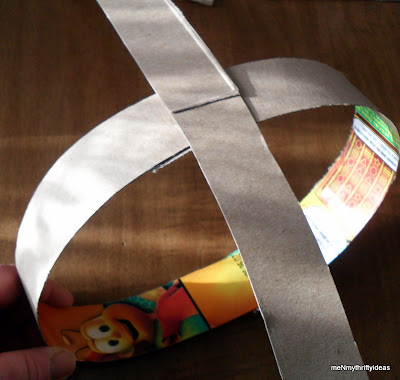
Next you need to glue the strips together forming a loop.  I used hot glue for this.
This is what your egg should look like when its all glued together.  
Next I spray painted the whole thing with Black spray paint.  {This is where I realized that I should have painted the strips before gluing} I then painted the outside of the strips in blue.
I had to use craft wire to get the egg shape.  I simply cut a piece long enough for the inside of the egg and formed Ts on each end.  It fit perfect.
I used raffia to make a "nest" for the egg and found the perfect table to display it on.  Simple, free and cute.  Works for me :)
 What do you think?

Sharing With:
Party Button

Friday, February 18, 2011

DIY Cardboard Barn Star

Don't forget to enter my Giveaway so that you can Have your own Star!! *PLUS* When you enter at What Allie's Making Now  she is giving away all the supplies needed to Make your own
Barn Star!


I love all the barn stars in everyone's decor and decided I should try to duplicate this look.  I have seen  people making stars from paper and have even tried it myself but I wanted something I could hang on the wall.  My solution?  Lightweight Cardboard.  I used empty boxes from a 24pk of Pepsi and a cereal box.  I first measured & cut my pieces into 9x9 squares.
I then folded each piece in half and then folded all the corners in to that middle line.  I decided not to make a perfect kite shape just to be different but you could always go traditional if you want.
I then used my hot glue gun to secure one end of the corners together.  I also glued the other flaps that I folded to each other forming the star shape.

After allowing the glue to dry I spray painted it first black as base paint and then went over it again with the Champagne color.  

I let that dry and all there was left to do was hang it! How simple and free?! Love it.
Sharing With:
monogram Chic on a Shoestring Decorating

Tip Junkie handmade projects


SAS Interiorsmmm button 


Thursday, February 10, 2011

Lucky Shamrock


I am sure all of you know the method for making a 4 leaf clover, right?  Four hearts connected at the bottoms = a lucky shamrock. I started off with a scrap piece of wood that I drilled two holes in for the wire to hang and spray painted.  I used corrugated cardboard for the base and painted it green first then topped it off with Champagne spray paint.  I am loving the effect it gives to other colors. I then painted my little wood hearts two shades of green and outlined them in the opposite shades.  I then used a Sharpie to outline the edges of the base and this is what I ended up with....what do you think?


Sharing With:


Party Button

  Beyond The Picket Fence