It's been way too long since I have been on here to let you all know what's going on in my world so let me begin by saying I missed you all so much! My son Tre is doing awesome these days and has made almost a complete recovery from Kawasaki Disease. He has regular check ups but is no longer on medication. Thank the Lord! Another big change is that my husband and I have decided to get a divorce. It was a mutual decision and we still remain friends. The other children are doing awesome in school and at home. All in all it has been a trying but very blessed year. I am so thankful for all of you who have left the sweet comments regarding my projects and my son's health. I appreciate all the prayers more than words can express. I am getting back into the swing of things and have some pretty awesome projects to share! See you soon...
Thursday, December 22, 2011
Saturday, June 11, 2011
Kawasaki Disease & My Son
Where to begin? Recently my son Tre started coming down with flu like symptoms and after the first 24 hrs I ended up taking him to the Emergency Room. They gave him fluids and treated the fever with Motrin. After a few hours we were sent on our way with some simple instructions and I thought it was behind us. The next day I realized his fever wasn't fading and I had to take him back to the ER. After admitting him for dehydration and the fever, my pediatrician came and immediately and diagnosed him with Kawasaki Disease. Since then I have been in Pittsburgh's Children's Hospital with him. We are now in PICU which is the Pediatric Intensive Care Unit.

http://www.ncbi.nlm.nih.gov/pubmedhealth/PMH0001984/
Kawasaki disease is a poorly understood illness. The cause has not been determined. It may be an autoimmune disorder. The disorder affects the mucus membranes, lymph nodes, walls of the blood vessels, and the heart.
Kawasaki disease can cause inflammation of blood vessels in the arteries, especially the coronary arteries. This inflammation can lead to aneurysms. An aneurysm can lead to a heart attack, even in young children, although this is rare.
Children with Kawasaki disease are admitted to the hospital. Treatment must be started as soon as the diagnosis is made to prevent damage to the coronary arteries and heart.
Intravenous gamma globulin is the standard treatment. It is given in high doses. The child's condition usually greatly improves within 24 hours of treatment with IV gamma globulin. Only in Tre's case he had adverse reactions to this medication and ended up worsening instead. His blood pressure dropped and swelling increased.
High-dose aspirin is often given along with IV gamma globulin.
Even when they're treated with aspirin and IV gamma globulin, up to 25% of children may still develop problems in their coronary arteries. Some research has suggested that adding steroids to the usual treatment routine may improve a child's outcome, but more research is needed.
Needless to say we are in desperate need of your prayers right now and I hope to continue blogging once this nightmare ends....
All information was pulled from
Saturday, May 14, 2011
DIY Home Wall Hanging
Hey, how is everyone this Saturday morning? I wanted to show you a sign I made while my laptop was on "vacation".


Sharing With:


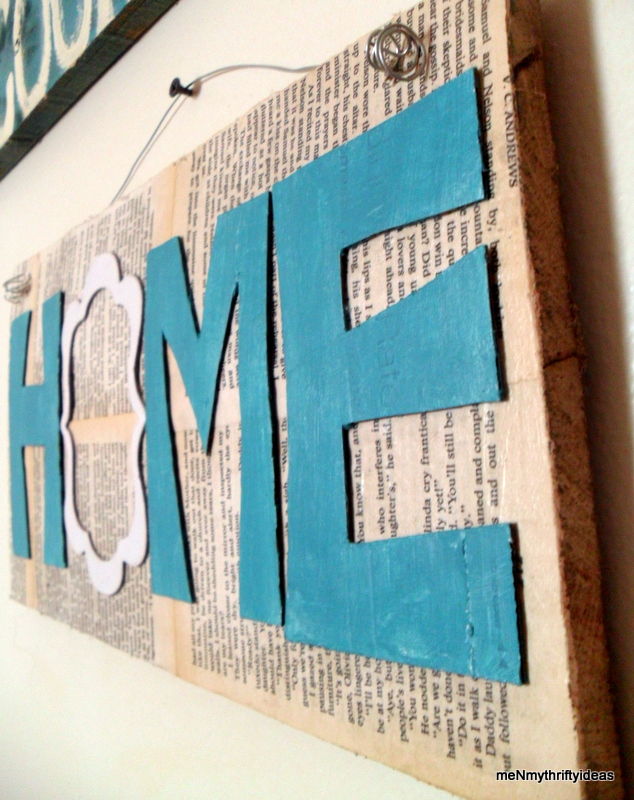

I used scrap wood and Mod Podged some old book pages to it. I then cut my letters out of cardboard and painted them. I used a chipboard frame for the "O". I drilled holes in the wood to attach the wire for hanging. You can easily twist the wire by wrapping it around a pen/pencil/paintbrush etc. I hot glued my letters on and finished it all off with a nice coat of Mod Podge. What do you think?
Sharing With:
Friday, May 13, 2011
Three Item Thursday Link Party {again}
Sorry everyone who didn't get to link up already but as I am sure you know...Blogger was PMSing so let's try this again! The new list for upcoming parties:

>Link Party Notes:
1. Please grab our button & invite your friends to the party! Have fun, this party is all about sharing your creative ideas using the week's 3 items.
2. The idea you link up should consist mainly of the 3 items listed for the week. Be sure & link to your specific post, not your main page
3. Visit others & leave nice comments. And don't forget us, we love comments too!
Wednesday, May 11, 2011
Red, white & Blue
I love the 4th of July sooo much that I have already started decorating :) I wanted to show you a few things I made to add to my collection of Holiday Decor...


And there is more where that came from :) So when do all of you usually start with your patriotic decor?
Sharing With:


Sharing With:
Bringing Thrifty Back

Hey guys, how are you?? I wanted to give you a quick heads up that Christina from The Tattered Tag and I have decided to bring the Three Item Thursday Party back! I am going to host the party starting tomorrow and we will alternate each week after. Being that this isn't much of a notice I figured we could start back with just a link up of any thrifty projects you have made. I also will be posting the new list for upcoming parties tomorrow. I am super excited and cannot wait to see what you guys have for me so make sure to stop by and link up!
Monday, May 9, 2011
Scrap Wood SIgn
Hey guys, how are all of you today? I am great and wanted to show you a little sign I made out of a piece of scrap 2x4 wood. I used Mod Podge to cover the piece with a brown lunch bag. I then added a cute plaid ribbon with hot glue. I picked up some wood letters a while back and finally used scrapbook paper to decorate them.


After sanding the edges of the letters all I had left to do was hot glue them on the wood and attach
a bracket for hanging. What do you guys think?


Sharing With:


Sunday, May 8, 2011
Happy Mama's Day
{Happy Mother's Day to all the lovely mom's around the world.}
So what did you end up getting for Mother's Day or end up giving? {do tell} I wanted to show you guys what I handmade for my mom this year.

Being that I just recently started diving into the craft world this past year I decided to give my mom a block dedicated to her {along with flowers ofcourse}. I started off with a wood block, scissors, scrapbook paper, rub ons & Mod Podge.


After using the Mod Podge to apply the paper to both sides I sanded the edges and started arranging the rub ons. {Anyone willing to give me a Cricut is more than welcome, lol}


I added a cream color ribbon tied around the edges and voilà! Handmade goodness straight from the heart for my mom this beautiful Mother's Day! I am now off to enjoy the rest of the day doing absolutely NOTHING....got to love it :)
Saturday, May 7, 2011
Another Use For Pallets
I love a good pallet project and this morning I decided I should show you all what I came up with the leftover "stubs" in between the boards. The pallet I got had huge blocks supporting the middle so I figured I might as well use them too!


That's right....candle holders! I painted them white and added the numbers for a little extra something! What do you think? Any other ideas for these wood blocks?
Sharing With:


Sharing With:
Thursday, May 5, 2011
Have You Heard?
Since I have missed so much in the last month, I have been parading around Blog Land swooning over everyones projects and came across this awesome new site called Craft Roulette.
| Craft Roulette is a quick and easy way to find new and fun crafts to create! |
You pick a category and "spin" to find a generated craft from projects all over. I absolutely love it! You also have the option to add one of your very own projects to be added to the fun! So cool that I just had to share!
Better Late Than Never

The items to use were paint chips, cereal box and twine. I came up with a cute little purse for Miss Olivia to drag carry around. :) First choice was an empty Cheerios box but a certain little boy insisted on using it to tote around his cars. I simply folded the sides in the middle to create the purse look. I also cut off the top portion that had been opened.

I painted the empty box and added a brown lunch bag to serve as the inner "liner" for the purse.

I used my hole punch to make a spot to add the "purse strings" :)

Next Olivia and I decorated the new purse using only paint chips, mod podge and a hole punch... and ofcourse a little glitter for some glam!


The whole project only took about a half an hour but this little box purse is actually pretty sturdy and she has been using it this entire time!
P.S. I managed to snap a shot of Tre at breakfast with his new "car tote" too ;)

Sharing With:
Wednesday, May 4, 2011
I am BAAACK ;)
I am so excited to finally be back!!! First, I apologize for missing a holiday so Happy belated Easter everyone! It feels like it has been forever so I don't even know where to begin...
 Everyone here is doing awesome and had a great Easter. We ended up having to hide eggs and candy throughout our entire house because it was rainy and cold here. The kids ended up loving it though! I think we may have started a new family tradition. I feel so horrible about our party I missed and want to apologize to everyone for not being here. I had to wait forever for my laptop and didn't have access to a computer to participate at all. Life without the blog was interesting though. I definitely got a lot more done around here but I am so grateful to be back! Now I am off to work on all these awesome posts from projects that I have to catch you up on! Talk to you soon!
Thursday, March 31, 2011
Excuses....Excuses
I need to apologize to all of you for missing our first link up party but unfortunately my laptop's screen has cracked so I have to wait for it to get fixed. Christina @ The Tattered Tag is still hosting the link up so make sure you stop over and show us how creative you guys are!
P.S. I managed to "steal" the PS3 in order to post this little note and hopefully will be talking to you all soon.
P.S. I managed to "steal" the PS3 in order to post this little note and hopefully will be talking to you all soon.
Saturday, March 26, 2011
Glass Coasters
So I have had these photo coasters for several years and after using them quite often they had begun to chip around the edges.

So what’s a girl to do?
Well, first I removed the backing for the photos and decided to soak these bad boys.

After washing them about 3 times I finally got to just the glass. The black was actually just super strong vinyl that eventually peeled away.

It was actually really nice glass and had no chips or cracks so I decided to redecorate them :) I went through my stash of rub ons and decided on some cute roosters. {Did I ever tell you I LOVE roosters?}


I love my new old coasters! What do you guys think?
Sharing With:
Subscribe to:
Posts (Atom)